Using Azure integration, you can manage Azure cloud products as a host of Mackerel and monitor its metrics. This function is only offered in the Trial plan and Standard plan.
Each Azure cloud product will be registered as one host in Mackerel and therefore be counted as a billable host. Virtual Machines will count as standard hosts and all other products will count as micro hosts. Additionally, the API of Azure will be called every 5 minutes for each targeted metric to be obtained. Please take note, for this reason, an Azure Monitor API usage fee may occur.
Currently, the following Azure cloud products are supported. For information on obtaining metrics, please refer to each individual document.1
SQL Database・Cache for Redis・Virtual Machines・App Service・Functions・Load Balancer・Database for MySQL・Database for PostgreSQL・Application Gateway・Blob Storage・Azure Files・Azure NetApp Files・Front Door
Integration method
Azure Integration will integrate using service principals.
A service principal is an ID that is used to access a specific Azure resource, and is more secure than using a user ID because it has limited permissions.
When configuring Azure integration, you’ll need access permission to do both "Create an application in the Microsoft Entra ID"2 and "Assign a role to the service principal". To confirm whether or not you have each permission, check out the items "Check Microsoft Entra ID permissions" and "Check Azure Subscription permissions" in the official document below.
This help document will introduce how to setup Azure integration with Azure CLI 2.0 and Azure Portal.
- Integration method
- Set up authentication credentials for your Azure account
- Select the Services and Subscriptions to Integrate
- Filter by tag
- Configure automatic new metrics addition
- Limit metrics retrieved
Set up authentication credentials for your Azure account
Create authentication credentials using either Azure CLI 2.0 or Azure Portal, and set them up in Azure Integration.
Integrate using Azure CLI 2.0
This section explains how to integrate using Azure CLI.
Install Azure CLI 2.0
Login and Service Principal configuration
First, login to Azure with the following command.
$ az login
To configure the service principal, you will need the subscription ID. Please obtain it in advance using the following command.
$ az account show --query id --output tsv
xxxxxxxx-xxxx-xxxx-xxxx-xxxxxxxxxxxx
Next, use the following command to simultaneously create a service principal for Azure integration and grant viewer privileges.
--years sets the expiration date of the password, with the default at 1 year. Please note that when the expiration date expires, obtaining metrics will be impossible until the password is reconfigured.
$ az ad sp create-for-rbac --role Reader --scope /subscriptions/xxxxxxxx-xxxx-xxxx-xxxx-xxxxxxxxxxxx --years <YEARS>
{
  "appId": "abcdefgh-abcd-efgh-abcd-abcdefghijkl",
  "displayName": "azure-cli-2017-01-23-45-67-89",
  "name": "http://azure-cli-2017-01-23-45-67-89",
  "password": "foofoo-bar-bar-foo-foobarbaz",
  "tenantId": "12345678-1234-5678-1234-123456781234",
}
Check out the following link for more about the options for create-for-rbac and more.
Among the above results, please set the value of tenantId as the Tenant ID in Mackerel, the value of appId as the Client ID, and password as the Secret Key. In Mackerel's settings screen, make sure that the Tenant ID, Client ID, and Secret Key are correctly set. If authentication fails, please check here for verification of the authentication information.

If there are no issues, proceed to Select the Services and Subscriptions to Integrate.
Integrate using Azure Portal
This section explains how to integrate using Azure Portal.
Login to Azure Portal
Visit https://portal.azure.com and login.
Obtain Tenant ID
Select Microsoft Entra ID from the sidebar and click "Properties".
Upon selecting, enter the displayed "Tenant ID" in the Tenant ID field of Mackerel's Azure integration configuration screen.


Create an Entra ID Application
When integrating with Mackerel, an application shall be created in Microsoft Entra ID in order to obtain metrics through application authority instead of user authority.
Select "App registrations" from the previous Entra ID screen.

Next, select "New registration" and the following screen will appear.

Please register an application for integration with Mackerel. The application's display name and redirect URI are not used on the Mackerel side. When choosing from 'Public client/Native', 'Web', or 'Single-page application (SPA)' for the redirect URI, please select 'Web'.
Obtain Client ID and Client Secret
When registration is complete, select the registered application from the previous screen. A screen like the one shown below should appear. Enter the "Application (client) ID" in the Client ID field on the Mackerel screen.


On this application's screen, next select 'Certificates & secrets'. Here, you can create a client secret. Click on 'New client secret', set a description and an expiration for the secret, and save. The value of the secret will be displayed. Copy this and enter it into the Secret Key field on the Mackerel side.
It will be shown as 'Invalid' on the Mackerel screen until permission settings are configured. Proceed to the 'Permission settings' section and grant viewing permissions.
Caution If the expiration date of this secret passes, it will no longer be possible to obtain metrics in Mackerel's Azure Integration from that point. In such a case, please create a new secret.


Permission setup
Although the keys have been obtained and configured with the above process, you must lastly grant permissions. Grant the permission to read metric values.
Please select 'Subscriptions' from the sidebar of the Portal screen. Then choose the target subscription and select 'Access control (IAM)'. Here, you can set permissions for users and service principals.
Now we will configure permissions for the Entra ID application that we created earlier.

Click on 'Add' and then 'Add role assignment'. For the 'Role', select 'Reader' and proceed.
If you accidentally select a permission other than 'Reader' here, for safety reasons, Mackerel's Azure Integration will not retrieve metrics.

In 'Assign access to', check 'User, group, or service principal', and for the members, select the application you created earlier.
Note: The search for the application name is prefix-based, so it won't appear unless you start typing from the beginning.

Click on 'Review + assign', and after a while, the permissions will be granted to the application.
In the 'Role assignments' tab, make sure that the application listed under the 'Reader' section is correct.

Since Azure integration supports multiple subscriptions, repeat the above permission configuration for any subscription you would like to monitor.
In Mackerel's settings screen, make sure that the Tenant ID, Client ID, and Secret Key are correctly set. If authentication fails, please check here to verify the authentication information.
Verify if the authentication credentials are correct
If there are errors in the settings and the integration fails, the following reasons may be displayed.
- Authentication with the provided credentials failed. Please verify the entered credentials.
- Excessively strong permissions have been granted. Please grant only the minimum necessary permissions.
- Currently, authentication is temporarily unavailable. Please try again after some time.

Please review your settings after confirming that there are no issues with the authentication credentials and permissions.
Select the Services and Subscriptions to Integrate
Choose the region and check the services you want to integrate.

If you want to select additional subscriptions to integrate, check the desired subscriptions. If you do not select any, all subscriptions will be included.

After confirming the hosts to integrate, save the settings. After a while, the hosts created by Azure Integration will be displayed in the host list.
Filter by tag
Specify the tag from Mackerel’s configuration screen. Confirm the number of integration hosts and save.
If you specify the tag like service: foo, service: bar, instances that allow tags with a key of service and value of foo or tags with a key of service and value of bar will be targeted. If the key or value includes a comma , etc., enclose it with quotations ("or '). For example, if the key is service, role and the value is foo, bar, specify "service, role": "foo,bar”.
Configure automatic new metrics addition
Mackerel may add new metrics as each Azure service is updated.
By turning on "Add new metrics automatically", you can avoid having to select metrics for retrieval on the Azure integration settings page each time they are added.

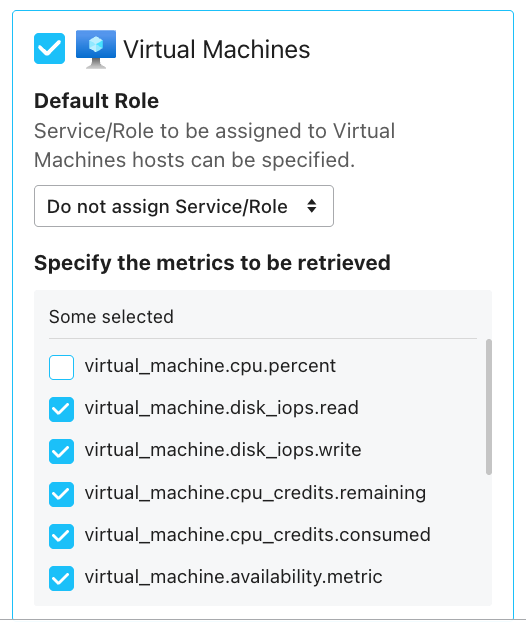
Limit metrics retrieved
Select the metrics you wish to retrieve in the Mackerel Azure integration configuration page. Uncheck any unwanted metrics and save them.
For example, to exclude virtual_machine.cpu.percent from being retrieved, simply uncheck the corresponding checkbox as shown below.